Quantcast
Channel: game boy advance – Hackaday
Viewing all 43 articles
Browse latest View live

Arduino based multiboot cable for Game Boy Advance

$
0
0

[Steve] wanted to do some ARM development and set his sights on the Game Boy Advance as a development package. In order to get his code onto the device he build an Arduino-based communications cable. It is necessary to have a microcontroller involved because the GBA uses a peculiar 16-bit serial communications protocol. This cable is an adaptation from the 8051-based cable developed by [Matt Evans] several years ago. [Steve's] got it working by porting the 8051 assembler over for the Arduino, but we’d recommend adding a level converter to his hardware setup to step down from the Arduino’s 5v logic to the 3.3v logic the GBA expects.

He didn’t make up a wiring diagram, but in the code comments [Steve's] laid out the connections as follows:

Arduino 8 to GBA SO
Arduino 9 to GBA SI
Arduino 10 to GBA SD
Arduino 11 to GBA SC

That’s it, follow the README in his source code package and you’re on your way to some ARM development.


Filed under: nintendo gameboy hacks

Adding a MIDI input to a Game Boy

$
0
0

[Sprite_tm] is back again, and his work never fails to impress. His latest project is a Game Boy Advance MIDI synth that takes MIDI data from a keyboard or sequencer and maps that to Game Boy sound channels.

Because he seems to never do anything the normal way, [Sprite_tm] decided to run the Game Boy without a cartridge. We’ve seen this before; the GBA boots into the synth software over the link cable with multibooting.

[Sprite_tm] designed a circuit around an ATMega168 to boot the Game Boy, receive MIDI messages, then translate and send them through the link port. The main Game Boy code also has a simple interface to display graphics on the screen and a sequencer that allows him to record MIDI messages into 8 different tracks. We’re thinking that being able to sequence Game Boy chiptunes with a keyboard is a huge improvement over Little Sound DJ.

As [Sprite_tm] freely admits he’s not the best keyboard player, he gave his GBA synth to a musician friend. The resulting song is a veritable deluge of 8 bit chiptunes. The electronics behind this build are very simple (and can fit inside a MIDI cable), so we’re ready to break out the iron for this one. All the relevant code is posted [Sprite_tm]‘s build page. There’s also a video walking through the features of his creation, viewable below.


Filed under: nintendo gameboy hacks

Turning a DS into a Game Boy Advance

$
0
0

The venerable Game Boy is dead – and has been for a long time – after being replaced by the DS, DSi, DSi XL, and the 3DS. That doesn’t mean there’s nothing of value to the old Game Boy catalog; Pokemon Red/Blue is still as much fun as it was 15 years ago, and the game play of Advance Wars is still superb.

[Maarten] over at Bureau voor Gamers decided to put a modern twist on our old friend by taking a first-gen DS and converting it to a proper single screen Game Boy (Dutch, Google translation).

The donor machine was a broken first gen DS with a broken top screen. [Maarten] removed the top screen, did a tiny bit of Bondoing, moved the speaker, and gave his new toy a bright orange paint job.

Now [Maarten] has a modern version of the best portable system ever created, packed full of more powerful hardware and a much more capacious battery. Sure, it’s not a build that requires rewiring everything, but it’s still an awesome build for GBA aficionados.


Filed under: nintendo hacks

Building a tiny arcade cabinet from a Game Boy Advance

$
0
0

building-a-tiny-arcade-cabinet

[Jani 'Japala' Pönkkö] found a way to make his old Game Boy Advance exciting again. He poured a ton of time and craftsmanship into building a miniature arcade cabinet. He did such a good job it’s easy to think this is a commercial product. But when you open the back of the case to switch games one look at what’s crammed inside let’s you know this is custom work.

What’s most surprising to us is that he didn’t draw out a full set of plans before beginning. He simply measured the circuit board and LCD screen from the Game Boy and went with his gut for everything else. The case itself is crafted from baltic birch plywood, which was primed and painted before applying the decals. There is also a screen bezel made of acrylic with its own decal like you’d find on coin-op machines. These were made using printable sticker paper. The electronic part of the build involves no more than extending contacts from the circuit board to buttons mounted on the case. But he did also replace the stock speaker for one that produces better audio.


Filed under: nintendo gameboy hacks

A brick-sized Game Boy Advance SP

$
0
0

gameboy

For a few years now, [Michael] has wanted to put the guts of a Game Boy Advance – the small clamshell version with a backlit LCD – into the classic and comfortable DMG-01 ‘brick’ Game Boy. He’s finally finished with his project, and we’ve got to say it’s looking pretty good.

The build began by excising the backlit LCD from an old clamshell Game Boy Advance and hot gluing it to the screen bezel of an old DMG-01. The cartridge slot from the original ‘brick’ Game Boy remained, but this design decision did require a fair bit of soldering and a length of ribbon cable.

Since [Michael] is using the original cartridge slot found in the original Game Boy, he can’t play any games in the smaller Game Boy Advance cartridge format. Still, it should be possible to build an adapter to fit those smaller cartridges inside the larger Game Boy, and he can always play Tetris and Little Sound DJ, so nothing of value is lost.


Filed under: nintendo gameboy hacks

Pokemon Artificial Intelligence Is Smarter Than You

$
0
0

Who out there hasn’t angrily thrown a game controller across the room after continually getting killed by some stupid game-controlled villain? That is such a bummer! You probably wished there was some way to ‘just get past that point’. To take a step in that direction, [Ben] created an Artificial Intelligence program that will win at Pokemon Blue for Game Boy Advance.

The game is run in a Game Boy Advance emulator known as Visual Boy Tracer, which itself is a modified version of the most common GBA emulator, Visual Boy Advance. What sets Visual Boy Advance apart from the rest is that it has a memory dump feature which allows the user to send both the RAM and the ROM out of the emulator. The RAM holds all values currently needed by the emulator, this includes everything from text arrow flash times to details about currently battling Pokemon to the players position in the currently loaded map. The memory dump feature is key to allow the AI to understand what is happening in the game.

Pokemon Artificial Intellegence

The AI code is written in python and uses the pywin32 add-on that includes the Win32 API. The Win32 API allows the programs to interface with Windows, specifically simulating key presses. The AI uses these simulated key presses to interact with the emulator rather than building the emulator into the AI code. The AI Agent has two key goals: navigate the map to each new trainer and defeat each trainer with out loosing a Pokemon. These goals require separate modes, a ‘search’ mode and a ‘battle’ mode.

The search mode is the most basic form of AI, it’s a Reaction Agent. Reaction Agents simply react to what they can see at that particular time. In this case the agent is programmed to find the location next to the trainer. By knowing where it is and where it needs to go, the AI sends a simulated keystroke to move the player to the appropriate position. When in position, the AI will ‘challenge’ the trainer.

When in battle mode, the AI has a little bit more work to do. It starts by calculating the potential battle damage for all combinations of opposition Pokemons VS each of its own Pokemon. The AI then runs through a decision tree that dictates what decisions to make. For example, the decisions relating to health are higher in the decision tree and the AI will decide to heal a weak Pokemon before assessing any attacks. This ensures that no Pokemons are defeated.

Even if you are not a Pokemon fan you have to agree that this is an amazing exercise in DIY Artificial Intelligence. Check out the video to see this project in action.


Filed under: nintendo gameboy hacks

A Raspberry Pi in a Game Boy Advance SP

$
0
0

It’s not the biggest use of a Raspberry Pi, but running emulators for old game systems is by far the most visible use of the Pi. In fact, putting Pis inside old game systems has led to a resurgence of case modding not seen since the heyday of the Mini-ITX craze of the early ‘aughts.

You’d think every possible Pi casemod had been done by now, but [frostedfires] is still raising the bar with a Pi casemod that stuffs a clone of everyone’s favorite credit card sized computer into a Game Boy Advance SP.

[frostedfires] isn’t using a real Raspi from The Foundataion. Instead, he found the Odroid W, a raspi compatible board that’s about half the size of a model B. It still has everything needed to complete the build – analog video out, a reasonable Linux system, and enough processing power to run Quake III. Right now, [frostedfires] has the screen working – that was taken from a car backup camera. Other than that, the only portion of the build left to go is a few buttons.

This is officially the smallest derivative casemod we’ve ever seen. the previous record holder was the still tiny Game Boy Pocket build from last summer. That build required heavy modifications to the Model B board, though, so if you’re aiming for a smaller build, the Odroid is the way to go.

Thanks to the Bacman forums for yet another great build.


Filed under: nintendo hacks, Raspberry Pi

The Smallest Portable Pi

$
0
0

What do you get when you take an extremely small Raspberry Pi clone and stuff it inside a Game Boy Advance SP? We don’t know what to call it, but it’s probably one of the best portable gaming machines ever made, able to run emulators ranging from the Apple II to playing Quake III natively on a tiny flip-top display.

This isn’t the first time we’ve seen [frostedfires]’ work on a tiny system stuffed into a Game Boy. The initial post on this build over on the bacman forums just covered the basics – getting an Odroid W up and running, and putting Quake III on the tiny display. Now that the build is complete, we can get a look at what it takes to turn a Raspberry Pi clone into one of the smallest portable projects we’ve ever seen.

Using a Raspi clone as the only component in a tiny portable emulation station isn’t possible, so [frostefires] added a few other bits of electronics to make everything work. There’s a joystick from a PSP in there to work as the mouse, a few extra buttons in addition to the stock Game Boy ones, A USB hub, WiFi adapter, speaker and amplifier, a battery and the related charging electronics, and a Teensy 3.1 to handle all the input.

It’s a very impressive build that can run emulators ranging from the Apple II to later generation Nintendo consoles and handhelds (including the Game Boy Advance), but since the HDMI connector is availble on the outside of the case, [frostedfires] can also use this as a tiny, portable media center. Check out the video below to see this Game Boy in action, playing Mario Kart and 1080p video.


Filed under: nintendo gameboy hacks, Raspberry Pi

The Proper Use for a Gameboy Advance Carrying Case

$
0
0

About a decade ago, Nintendo released a Game Boy Advance carrying case in the shape of a Game Boy Advance. It was the obvious answer to the original brick Game Boy carrying case every eight year old had in 1990. This jumbo-sized Game Boy Advance case also makes a really good platform for a console mod, which is exactly what [frostefires] got when he put an N64 in one.

This isn’t the first time we’ve seen this bit of old Nintendo paraphernalia used to house an N64. A few years ago, [Hailrazer] used the same GBA carrying case as the body of an N64 build. There were a few shortcomings in that build, most importantly the removal of the D pad.  [frostedfires]’ build fixes this oversight.

Inside the GBA enclosure is a 4.3 inch screen, a replacement Gamecube joystick, an SNES D pad, and of course the entire N64 circuit board with a few modifications.

[frostedfires] entered this into a ‘Shark Tank’-ish  competition at school, and this build was so impressive he won first place. Link to the full build thread here.


Filed under: nintendo gameboy hacks, nintendo hacks

BeagleSNES for Game Boy, Game Boy Advance, NES, and – yes – SNES

$
0
0

By far the most common use for the Raspberry Pi is shoving a few dozen emulators on an SD card and calling it a day. Everybody’s got to start somewhere, right? There are other tiny, credit card-sized Linux boards out there, and [Andrew] is bringing the same functionality of the Raspi to the BeagleBone Black and BeagleBoard with BeagleSNES, an emulator for all the sane pre-N64 consoles.

BeagleSNES started as a class project in embedded system design, but the performance of simply porting SNES9X wasn’t very good by default. [Andrew] ended up hacking the bootloader and kernel, profiling the emulator, and slowly over the course of three years of development making this the best emulator possible.

After a few months of development, [Andrew] recently released a new version of BeagleSNES that includes OpenGL ES, native gamepad support through the BeagleBone’s PRU, and support for all the older Nintendo consoles and portables. Video demos below.


Filed under: classic hacks, nintendo hacks

Hackaday Links: March 8, 2015

$
0
0

Nintendo is well known for… odd… hardware integration, but this video takes it to a new level. It’s a Gamecube playing Zelda: Four Swords Adventure, a game that can use a Game Boy Advance as a controller. [fibbef] is taking it further by using the Gamecube Game Boy Advance player to play the game, and using another GBA to control the second Gamecube. There’s also a GBA TV tuner, making this entire setup a Gamecube game played across two Gamecubes, controlled with a Game Boy Advance and displayed on a GBA with a TV tuner. The mind reels.

TI just released a great resource for analog design. It’s the Analog Engineer’s Pocket Reference, free for download, if you can navigate TI’s site. There are print copies of this book – I picked one up at Electronica – and it’s a great benchtop reference.

A few months ago, a life-size elephant (baby elephants are pretty small…) was 3D printed at the Amsterdam airport. A model of the elephant was broken up into columns about two meters tall. How did they print something two meters tall? With this add-on for a Ultimaker. It flips an Ultimaker upside down, giving the printer unlimited build height. The guy behind this – [Joris van Tubergen] – is crazy creative.

And you thought TV was bad now. Here’s the pitch: take a show like Storage Wars or American Pickers – you know, the shows that have people go around, lowball collectors, and sell stuff on the Internet – and put a “Tech” spin on it. This is happening. That’s a post from a casting producer on the classic cmp message boards. Here’s the vintage computer forums reaction. To refresh your memory, this is what happens when you get ‘tech’ on Storage Wars. Other examples from Storage Wars that include vastly overpriced video terminals cannot be found on YouTube. Here’s a reminder: just because it’s listed on eBay for $1000 doesn’t mean it’ll sell on eBay for $1000.


Filed under: Hackaday Columns, Hackaday links

Use The Internet To Get Your Kadabra To Evolve

$
0
0

If you grew up playing Pokemon Red or Blue, you might have moved far away from your childhood friends by now. If you’re still playing Pokemon Red or Blue, you can now literally reconnect with these friends using [Pepijn]’s new and improved Game Boy link that lets players trade Pokemon over the internet.

Based on [Pepijn]’s previous work building an Arduino-based Pokemon storage system (which was inspired by a separate project that was able to spoof trades), the device allows a Game Boy (including Pocket, Color, and Advance versions) to connect to the Internet via a Teensy shield. The online waiting room software is called TCPoke which facilitates the Internetting of the Game Boys. From there, all you have to do is connect via the project’s wiki!

The TCPoke software is available on the project’s site. Also, be sure to check out the video below which shows a demonstration of how the software works. There is noticeable delay compared to a direct link between Game Boys, but it functions very well. We didn’t see this link system work for a battle, but it would be interesting to see if it is possible. If so, you might never have to go to a Pokemon League meeting again!


Filed under: classic hacks, nintendo gameboy hacks

Mythical Game Boy Advance Colors Hacked Into Reality

$
0
0

When it was announced in 2000 at a Nintendo trade show, the Game Boy Advance was clad in beautiful silver plastic, accented with brilliant orange buttons. As is usually the case with product introductions, the first color and style displayed to be public became the most popular. There was one problem with this silver and orange GBA; Nintendo never put it into production. Fast forward fifteen years, and [Michael Choi] decided it was time to make his own silver and orange Game Boy. It’s a great introduction to mold making and very detailed painting, and a useful guide for turning engineering prototypes into beautiful objects.

[Michael]’s build began with an aftermarket shell, painted with Tamiya spray paints. The color is remarkably accurate, considering the only pictures for the silver and orange Game Boy are fifteen years old, and with the right painting technique, these colors are indistinguishable from a properly colored, injection molded piece of plastic.

GBAsquareThe buttons were not as easy as the shell. [Michael] originally decided casting would be the best solution, but after multiple attempts, he couldn’t get the color right. Even with opaque dyes in the resin, the buttons would still come out slightly translucent. In the end, [Michael] decided to paint the original buttons.

This casemod isn’t just about changing the color of the enclosure. [Michael] also wanted is Game Boy to have the backlight found in the second revision clamshell GBA. This was easily acquired on eBay, and with a few slight hardware modifications and a beautiful glass lens to replace the plastic occupying the bezel, [Michael] has a gorgeous Game Boy Advance, taken straight from a press event fifteen years ago.


Filed under: nintendo gameboy hacks, nintendo hacks

Breaking Out A Game Boy Link Cable

$
0
0

[Samuel] is working on one of the most important electronics projects of our generation. He’s building a device for the Game Boy that will allow Pokemon trades between generation II and III. Yes, This means bringing your Charmander from Pokemon Red to your team in Pokemon Ruby, Sapphire, or Emerald. and finally completing the National Dex you’ve been working on for 20 years. Before he gets to designing this system, he first needs to listen in on the Game Boy Link Cable, and that means creating a breakout board.

The Game Boy Link Cable – sometimes inaccurately referred to as the Zelda cable – is a special proprietary connector. The design is well documented, but unlike the Wii Nunchuck controller, there’s no readily available breakout board available for this piece of obsolete technology.

Together with a his friend [David], [Samuel] loaded up a copy of Eagle and designed a board that will fit on a small piece of copper clad FR4. This design was then sent over to a small CNC mill, The traces were machined away, and a sextet of pins were soldered into the holes.

With a breakout board for the Game Boy Link Cable, [Samuel] now has a great platform for peering into the strange and magical world of Pokemon. He’ll be using a Teensy microcontroller for his trading device, and with several similar projects already completed by others around the Internet, the potential for a Gen II to Gen III Pokemon trader is palpable.


Filed under: classic hacks, cnc hacks

Anti-Emulation Tricks on GBA-Ported NES Games

$
0
0

Emulation is a difficult thing to do, particularly when you’re trying to emulate a complex platform like a game console, with little to no public documentation available. Often, you’ll have to figure things out by brute force and dumb luck, and from time to time everything will come unstuck when a random piece of software throws up an edge case that brings everything screeching to a halt.

The Classic NES series was a handful of Nintendo Entertainment System games ported to the Game Boy Advance in the early 2000s. What makes them unique is a series of deliberately obtuse programming decisions that make them operate very differently from other titles. These tricks utilize advanced knowledge of the way the Game Boy Advance hardware operates and appear to have been used to make the games difficult to copy or emulate.

The games use a variety of techniques to confuse and bamboozle — from “mirrored memory” techniques that exploit addressing anomalies, to putting executable code in video RAM and writing to the audio buffers in unusual manners.

Even more confusingly, these techniques only appear to have been used in the Classic NES series of games, and not other Game Boy Advance titles. It’s not obvious why Nintendo went to special effort to protect these ports over other titles; perhaps the techniques used were for other reasons than just an attempt at copy protection. Speculate amongst yourselves in the comments.

This isn’t the first time we’ve discussed emulation of Nintendo systems — check out this effort to reverse engineer the Sony Pocketstation.

[Thanks to [[[Codifies]]] for sending this in!]


Filed under: handhelds hacks, nintendo gameboy hacks

HDMI Out on the Gameboy Advance

$
0
0

The Gameboy line of handheld systems from Nintendo have been wildly popular, but lack one major thing – a video output. This can be troublesome if you’d like to view the games on a bigger screen, for more comfortable gaming sessions or detail work like producing chiptunes. One option is to use the Gameboy Player for the Gamecube, however that system’s age means you’re out of luck if you want a crisp, clear picture on a modern digital display. Wouldn’t it be great if you could get HDMI output from a Gameboy Advance Instead?

A family resemblance?

When it comes to working with video signals, FPGAs can’t be beat. [Stephen] leverages an FPGA in this project to read the GBA’s video signals and convert them to the modern digital format. Unfortunately, it’s not a seamless install – limited space means the GBA’s screen must be entirely removed, replaced with the adapter in a manner resembling the terrifying Facehugger.

Packaging aside, the output from the device is nothing short of stunning – the graphics are absolutely crystal clear when displayed on a modern HDMI television. This is because the FPGA is capturing the exact digital output from the GBA, and piping it out as HDMI – there’s no analog fuzziness, conversions or noise to spoil the image. Output is a tasty 1280×720, upscaled from the GBA’s original resolution. For more details, check out the forum thread where [Stephen] runs through the build.

The only thing missing  is details – we’d love to know more about the exact hardware used, and any trials and tribulations during the build! As far as we can tell, the build doesn’t stop at just video – a SNES controller is used instead of the original buttons, and we have a feeling sound is being passed over the HDMI channel as well sound is piped to the TV from the GBA’s headphone port.

It’s great to see these projects for old hardware come out – modern hardware has the muscle to achieve things previously unthinkable on retro consoles. We’ve seen similar projects before – like adding VGA to an original Game Boy.


Filed under: nintendo gameboy hacks, nintendo hacks, slider

Game Boy Advance Hiding In a Medical Device

$
0
0

It turns out that medical manufacturers also do hacking once in a while. [JanHenrikH] recently tweeted a photo of an ECG-Trigger-Unit that he’d opened up. Inside he found that the LCD screen was that of a Game Boy Advance (GBA) and the reason he could tell was that the screen’s original case was still there, complete with GAME BOY ADVANCE SP written on it.

In the manufacturer’s defense, this device was likely made around the year 2000 when gaming products were some of the best sources for high speed, high quality, small LCDs displays.  This design document for a portable ECG measurement instrument from as recently as 2013 cites reasons for using a GBA as:

  • impressive plotting results,
  • no serious transmission delays, and
  • fine graphics processing capability.

The Verge had even turned up this US patent from 1997 that has the diagnostic medical device be a cartridge for plugging into a Game Boy. At the time, PCs were frequently used for medical displays but this patent cites issues such as the higher cost of PCs, software installation issues, and crashing. However, they talk about the crashing being due to running word processing and spreadsheet software on the same PC, something not likely to happen if the PC is dedicated to bedside monitoring.

But despite all those pros, wouldn’t you feel surprise and alarm when you first glimpse the Game Boy inside the device that’s monitoring your heart? We also have to wonder what licensing these products went through in the countries in which they were used. This particular device was made by German company Medical Imaging Electronics.

Game Boy hacks aren’t limited to the medical industry though. Here on Hackaday, we’ve seen them turned into remote controls for flying drones and we’ve seen Game Boy cartridge emulators that use STM32. Finally, if you’re wondering where you saw [Jan Henrik]’s name before, he was one of the two hackers driving the motorized armchair in a photo in our [Jenny List]’s SHACamp 2017 write-up.

Our thanks to [geonomad] for the tip!


Filed under: Medical hacks, slider

Building a Supersized Game Boy Advance

$
0
0

Unless you really look closely at the image above, you might not realize you aren’t looking at a normal Game Boy Advance; which is sort of the point. Even though it retains the looks of the iconic Nintendo handheld, this version built by [Akira] is supersized for adult hands. How big is it? To give you an idea, that screen is 5 inches, compared to the 2.9 inch screen the original sported.

Unlike most of the portable gaming hacks we’ve covered recently, this big-boy GBA isn’t powered by a Raspberry Pi. Internally it’s packing a genuine GBA motherboard, which has been wired into a portable screen originally intended for the PlayStation.

Though that may be understating things a bit, as getting the round PCB of the original screen into the rectangular shape of the GBA meant it had to be cut down and the traces recreated with jumper wires. The original CCFL backlight of the screen had to go in the name of battery life, and in its place is the backlight system pulled from a Nintendo DSi XL.

But where did [Akira] get a giant GBA case to begin with? No, it isn’t 3D printed. It’s actually a hard carrying case that was sold for the GBA. The carrying case obviously didn’t have a cartridge slot or openings for buttons, so those sections were grafted from a donor GBA case. So despite the system overall being so much bigger than the original, the D-Pad, face buttons, and cartridge slot on the back are at normal GBA scale.

The GBA XL is really a labor of love; browsing through the build log you can see that [Akira] actually started the project back in 2014, but it kept getting shelved until more research could be done on how to pack all the desired features into the final device.

While this may be the most historically accurate attempt at making a bigger Game Boy, it certainly isn’t the first. There seems to be a fascination with turning the quintessential pocket game system into something that’s quite the opposite.

GBA on the Big Screen: FPGA Delivers HDMI and Every Feature Imaginable

$
0
0

The concept of creating a gaming portable out of a home console has been around for some time, but it’s hardly seen the other way around. There have been a few devices that dared to straddle the line (i.e., Sega Nomad, Nintendo Switch, etc.), but the two worlds typically remain separate. [Stephen] looked to explore that space by attempting to turn the Game Boy Advance into a “big boy” console. The FPGA-based mod kit he created does just that, and comes complete with controller support and digital video output in 720p over a mini HDMI cable.

The kit itself was designed specifically for the original model GBAs containing the 40-pin LCD ribbon cable. These original models were the early run of non-backlit screens that are also denoted by a motherboard designation that can be seen by peering into the battery compartment. RGB signals are read directly from the GBA LCD socket by removing the handheld’s screen in favor of a fresh flat flex ribbon cable. This method enables a noise-free digital-to-digital solution as opposed to the digital-to-analog output of Nintendo’s own Game Boy Player add-on for the GameCube.

At an astonishing 240×160 native resolution, GBA video is scaled by the FPGA up to 5x within a 720p frame. Of course some of the image is cutoff in the process, so options for 4x and 4.5x scales were included. As a wise man once said, “Leave no pixel behind”. Since Nintendo designed the GBA clock to run at 59.7276 Hz, [Stephen] removed the oscillator crystal in order to sync the refresh rate to a more HDMI friendly 60 Hz. This means that the mod kit overclocks GBA games ever so slightly, though [Stephen] included a GBA cycle accurate mode as an option if your display can handle it.

The video below is [Stephen]’s initial test using a SNES controller. Tests must have gone well, because he decided to incorporate a SNES controller port in the final design. Now all those Super Nintendo ports on the GBA are back home once again thanks to this “consolizer” kit.

For those seeking a comprehensive overview of all the Game-Boy-to-TV video solutions out there, there’s a great video from RetroRGB to view as well.

FPGA Brings Arduboy to the Game Boy Advance

$
0
0

Hackaday readers are perhaps familiar with the Arduboy, an open source handheld gaming system that aims to combine the ease of Arduino development with the seething nostalgia the Internet has towards the original Nintendo Game Boy. While not quite the same as getting one of your games published for a “real” system, the open source nature of the Arduboy platform allows an individual to develop a game playable on a commercially manufactured device.

While the Arduboy hardware itself is actually quite slick, that hasn’t stopped people from trying to bring its games to other pieces of hardware. Now thanks to the efforts of [uXe], the Game Boy Advance is well on its way to becoming Arduboy compatible, in a way bringing the whole project full circle. Assuming this gadget becomes a commercial device (it sounds like that’s still up in the air), Arduboy developers will be able to proudly play their creations on the final and objectively best entry into the Game Boy line.

Getting to this point has been something of an adventure, as documented in a thread from the Arduboy forums. Members of the community wondered what it would take to get Arduboy games running on a real Game Boy, but pretty quickly it was decided that the original beige brick model wasn’t quite up to the task. Eventually its far more capable successor the Game Boy Advance became the development target, and different approaches were considered for getting existing games running on the platform.

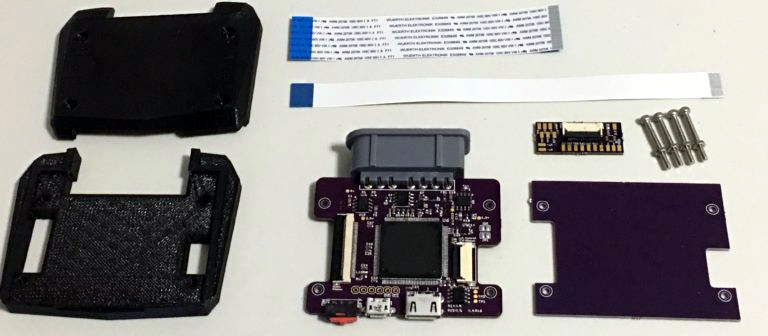
While there were some interesting ideas, such as using the GBA’s link port to “feed” the system games over SPI, in the end [uXe] decided to look into creating an FPGA cartridge that would actually run the Arduboy games. In this scenario, the GBA itself is basically just being used as an interface between the FPGA and the human player. In addition to these low-level hardware considerations, there was considerable discussion about the more practical aspects of bringing the games to the new hardware, such as how to best scale the Arduboy’s 128 x 64 output to the GBA’s 240 × 160 screen.

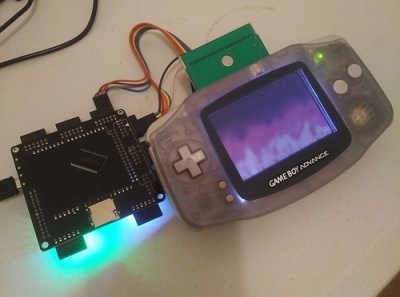
As demonstrated in the videos after the break, [uXe] now as all the elements for playing Arduboy games on the GBA in place, including the ability to disable full screen scaling by using the shoulder buttons. Now he just needs to shrink the hardware down to the point it will fit inside of a standard GBA cartridge. Beyond that, who knows? Perhaps the appeal of being able to run Arduboy games on a real Game Boy is enough to warrant turning this hack into a new commercial product.

Thanks to a hardware swap we’ve seen Arduboy games played on the Dreamcast VMU, and [uXe] himself previously grafted Arduboy-compatible hardware into an original Game Boy, but being able to play these games on an unmodified Game Boy Advance obviously has its own appeal. At the very least, it will be a bit more ergonomic than using a hacked classroom gadget.

Viewing all 43 articles
Browse latest View live


<script src="https://jsc.adskeeper.com/r/s/rssing.com.1596347.js" async> </script>